Herringbone Tiling
by Tuğrul Yazar | February 23, 2015 02:32
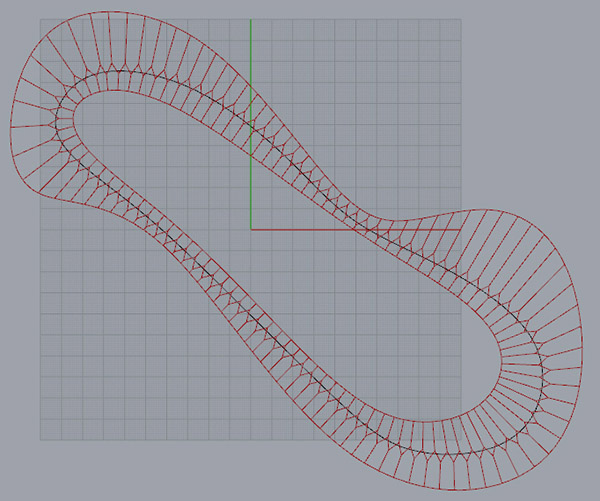
This quick project was about a special tiling pattern inside a multi-story residential building’s hallways in Grasshopper[1]. While drawing the construction documents of the project, it was necessary to apply some coding here, as each floor had a different shape to be tiled. Although it is not a real [2]Herringbone tiling, I named it because I couldn’t find a better name yet.
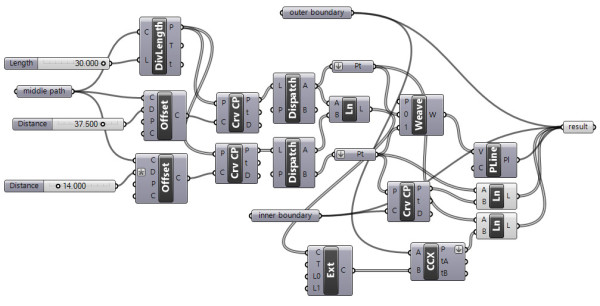
First, I’ve imported the geometric boundaries and the “middle curves” of the designed tiling pattern. Then, I extended the division points for either side of the middle curve to the outer boundary curves. This is easy in Rhino. But in Grasshopper, extending and trimming curves can be painful sometimes. In fact, the design was a simple one, yet to be handled carefully. After solving an example boundary like the one you see below, the Grasshopper definition generated all tiling solutions for the remaining hallways very quickly. This saved lots of time.

 [3]
[3]The resulting curves are not individual tiles, but line segments only. Making them individual tiles is the topic of another study. Also, adding a parameter to control the number of in-between rows can be a good Grasshopper challenge. The current Grasshopper definition still works after 9 years in 2023.
You can re-build the definition by looking at the image above. However, if you want to download and use the working Grasshopper file; would you consider being my Patreon? Here is the link to my Patreon page[4] including the working Grasshopper file for the Herringbone Tiling, and many more.
- Grasshopper: https://www.designcoding.net/category/tools-and-languages/grasshopper/
- real : https://dictionary.cambridge.org/tr/s%C3%B6zl%C3%BCk/ingilizce/herringbone
- [Image]: https://www.designcoding.net/decoder/wp-content/uploads/2014/12/2014_11_26-kathol-def.jpg
- Here is the link to my Patreon page: https://www.patreon.com/posts/herringbone-81302537?utm_medium=clipboard_copy&utm_source=copyLink&utm_campaign=postshare_creator&utm_content=join_link
Source URL: https://www.designcoding.net/herringbone-tiling/