Interface: Grasshopper for Beginners (3)
by Tuğrul Yazar | November 29, 2022 11:38
Installation
In this episode of Grasshopper for Beginners[1], we will look at the Interface. If you do not have the Rhino software, you can download the 90-day trial version from www.rhino3d.com[2] and install it. The website will give you the latest version, Rhino 7.
The compatibility of the applications and examples with the Rhino 7 version has been checked. Therefore, all applications and examples can run on version 1.0.0007 of GH used on Windows-based computers, and SR34, the latest version of Rhino 6, and 7.4, the current version of Rhino 7. The only exception is the sixth episode, where we introduce you to some of the SubD components added to Grasshopper with Rhino 7.
File Format
Apart from some minor differences, the usage of both Rhino and GH is the same on iOS operating systems. Most of the applications in this series will remain available for a long time without needing to be updated. We will publish some exercise files in the gh format. Those with .gh extension in application files are GH codes. You can open them with the Open command from GH’s File menu. The .3dm extension is the drawing files of Rhino. You can also open them using the same command in Rhino’s own File menu.
Some applications only have the .gh file. These do not need an additional drawing file. Applications with a drawing file will not work properly unless both the .3dm and .gh files are opened, as they usually receive data from this file. If there are both .3dm and .gh in a folder, you will need to have both opened in the respective program.

Rhino Experience First
We should explain the Interface first for the Beginners of Grasshopper. When we finish the installation, we can run GH by typing Grasshopper on the command line and pressing Enter (Figure above). For those who know AutoCAD, it is not difficult to get to know and start using Rhino. Therefore, if you want to practice your hand, you can try to work around Rhino a little bit and try to solve some things. For example, the classics of AutoCAD such as Layer, Osnap, Ortho, and Polyline are almost exactly the same.
In order to work comfortably in GH, you must first control the image with Zoom, Pan, and Orbit in Rhino at least at a basic level; We recommend that you try the point and line creation commands. If you open the Command Help feature in Rhino’s Help menu, you can also access animated explanations of all the commands you run in Rhino. We will be talking about the Rhino commands that you will need in the applications in this series, but let us remind you that this is not a Rhino tutorial.
The Grasshopper Interface

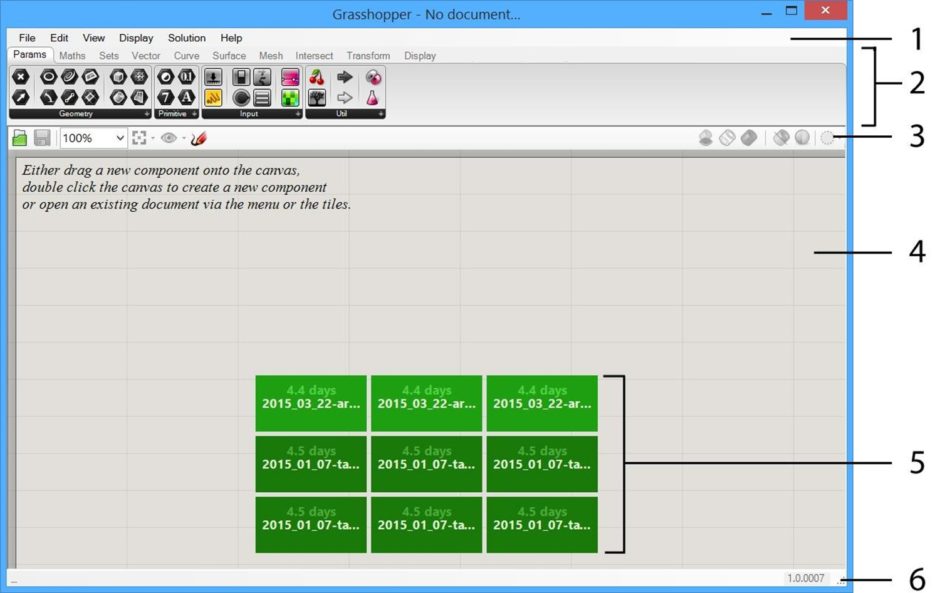
GH welcomes us with an interface like the figure above:
(1) Menu bar: These are the menus where we control the basic settings related to the operation of the GH. For example, file-saving operations are in the File menu and there are cut-paste commands in the Edit menu. Moreover, some adjustments on how the GH is displayed in its own window and in the Rhino window in the View. And Display menus, the commands needed to run or stop the GH in the Solution menu, and help tools in the Help menu. We will examine the commands in these menus as appropriate.
(2) Component tabs and panels: These panels contain commands that are the main function of the GH. We will call these commands “components”. We will try to review most of them as systematically as possible throughout this book.
(3) Canvas toolbar: Some of the most frequently used actions in the menu bar are at your disposal here. For example, saving files and changing some display settings.
(4) Canvas: The GH canvas is initially an empty space, and the components placed in this area come together to form a data flow diagram. You’ll understand better once you start doing something.
(5) Recently opened files: If there is no application currently running in the GH. These boxes show the GH files you have opened recently.
(6) Status bar: It is the standard status bar. The version number of the GH is here.
This is it for the Grasshopper for Beginners: Interface, the third episode.
- Grasshopper for Beginners: https://www.designcoding.net/grasshopper-for-beginners-1/
- www.rhino3d.com: http://www.rhino3d.com
Source URL: https://www.designcoding.net/grasshopper-for-beginners-3-interface/