3D Voronoi Puzzle
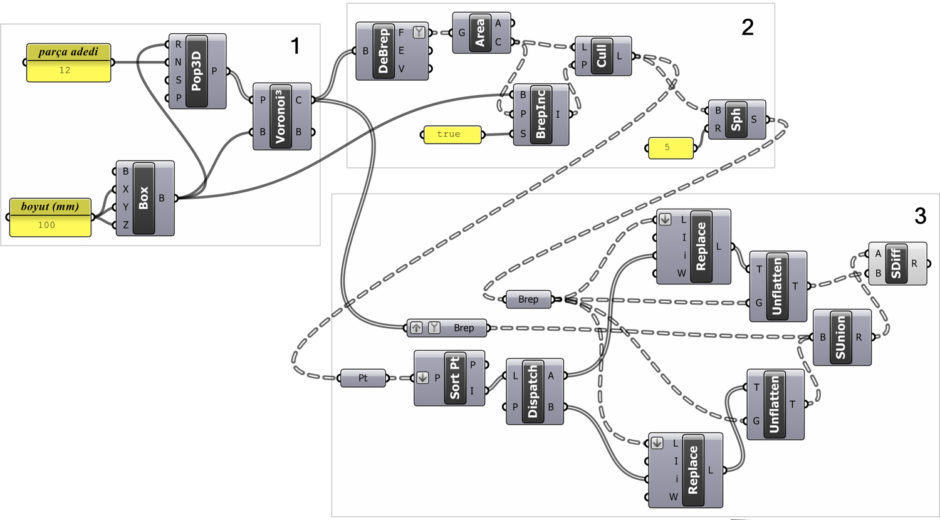
Here, our aim is to generate a 3D Voronoi puzzle ready for 3D printing. Below is the step-by-step explanation of this Grasshopper algorithm:
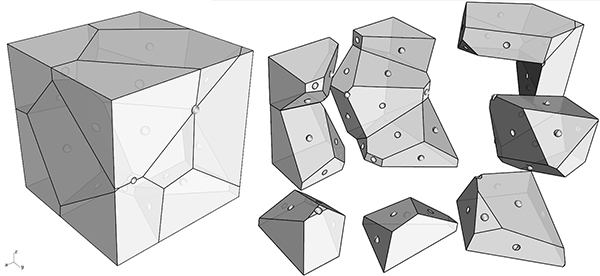
The 3D Voronoi Puzzle
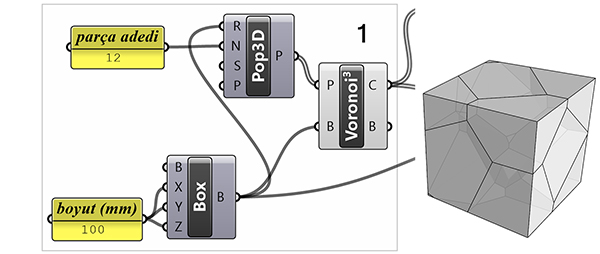
Step number one is the application we saw earlier in the Voronoi diagrams. We obtain random polyhedra within a given volume quickly. The basic features we need for the puzzle are: (1) When we solve the puzzle the final volume should be a cube. (2) We should control the dimensions of the total volume, for 3D printing. (3) Controlling how many polyhedra there will be in total. The fastest and most effective GH component that meets all these conditions is Voronoi 3D (Voronoi3). When we bake the result of step number one, we should have ready-made random Voronoi cells. This will give us the cube-shaped volume we want.
The General Detail Design
The next part of the application works on the interlocking detail. Our expectation from this detail; (1) We should create the detail on the interior surfaces, not on the outer surface of the puzzle. (2) The surfaces with indentation or protrusion should be as simple as possible.
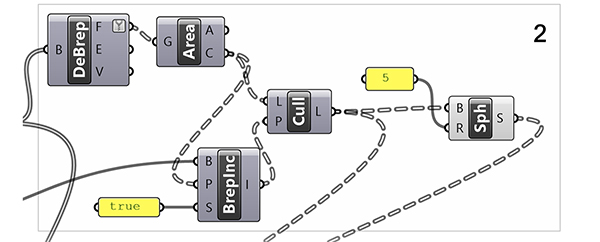
The figure above focuses on the first of the above expectations. First of all, we explode the Voronoi cells into their surfaces (F output) with the Deconstruct Brep (DeBrep) component. We find the midpoint of each surface with the help of the Area component. These points define the centers of the small spheres to be added (Solid Union (SUnion)) and subtracted (Solid Difference (SDiff)) to produce the indentations and protrusions.
We have more to do with these points. First, we should remove the spots on the outer surfaces of the cells from the process. We use the Point in Brep (BrepInc) component. The Point in Brep (BrepInc) component alone will not solve this. Since the data obtained from here is a boolean type data, we can use the Cull Pattern (Cull) component.
Detail Design Continued
In this way, we can get the L output from the points we have so that the ones on the outer wall of the volume are deleted. By placing a sphere (Sphere (Sph)) at these points, we create our detail. What we’ll do next gets a little more complicated for GH, so we should think about it first. We have the midpoints of the adjacent surfaces of the adjacent ones of each Voronoi cell. If you examine these points, you will see that two are produced from each point, one in each of the neighboring Voronoi cells. The issue we need to solve is that each of the spheres that we will place at these points must be mutually removed from one cell and added to the other cell.
This means that we will apply a series of Solid Union (SUnion) and Solid Difference (SDiff) components. In this case, we need to match the boolean operations we will do in the form of a data tree, not like a list. In this data tree, for each Voronoi cell, the spheres to be added or removed will be in the form of a list. Now let’s examine what happened in part three.
Applying the Details of 3D Voronoi Puzzle
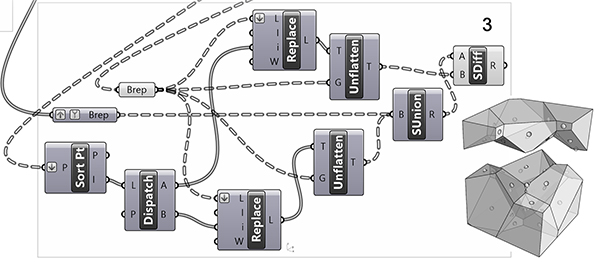
In the third part, we add the spheres to one of the neighboring surfaces and subtract from the other. For this, first of all, we need to separate the point pairs from the Cull Pattern (Cull) component. Since each pair of points is the center of the same surface of two adjacent cells, their coordinates are the same. These emerge from the Cull Pattern (Cull) component in the form of a data tree. Each path of this data tree starting with {0} branch represents the surfaces of a Voronoi cell. This information is very important to us. Because we need to be able to accurately tell which sphere to add and subtract from which cell. If we find which ones are even among these point coordinates in the form of a data tree, we will find the cells that are adjacent to each other.
Sorting the Points
One way to compare all points with each other is to use the Sort Points (Sort Pt) component. In order to examine this set of points in the form of a data tree as a whole, we briefly transform the data tree into a simple data list with the help of Flatten. The Sort Points (Sort Pt) component sorts the points by X, Y, and Z coordinates. The component will help us find out which two coordinates are congruent. Therefore, when we examine the data obtained from the Sort Points (Sort Pt) component, we see that the arrayed points always line up the same points one under the other in pairs.
What we need here is not the coordinates of the points, but I, another output of Sort Points (Sort Pt), that is, the index values in the input list of the ordered elements. The Dispatch component that follows will take these indices and distribute their elements sequentially, turning them into two separate lists. When we examine them, we can see which cell corresponds to which surface, among all the Voronoi cells we have. This data is not legible enough at the moment, you can reduce the number of parts to be able to examine it comfortably. For example, you can reproduce the model with only 4 parts.
Dispatching the Spheres
List A from Dispatch contains one of the pairs among all Voronoi cells. List B contains the index values of its corresponding copy. Now, we will ensure that we distributed the spheres correctly to both lists. As an approach we have used before, we first place all of the spheres at all points. We connect this list of spheres and the mutual point lists to a Replace Items (Replace) component. This component matches the sphere list with Flatten from input L with the index list it gets from Dispatch.
Elements in those indices in the list are directly replaced with null data since no value is entered in the I input. This change is critically important to us. Because one of the two data lists from Dispatch contained one of the pairs in all the surfaces of all cells. The other list contained the other pairs. We need to put one of these pairs in the insertion process and the other in the subtraction process.
Unflattening
When we delete the elements of the lists consisting of spheres according to this calculation, you can examine the L outputs from both Replace components. As you will see, these have produced two opposite data lists. What we need is to convert these two lists, which we flattened, back to the data tree of Voronoi cells. The reason why we used Replace instead of Cull Index (Cull i) while deleting the spheres was to fill the gaps with data that cannot be processed (with null) to be able to reconstruct this data tree.
The Unflatten Tree (Unflatten) component transforms a data list into a data tree using a guide data tree with the same total number of elements. While doing this, since it does the opposite of the flatten operation, it transforms the data list we just created. The data tree we use as a guide is the data tree containing the Voronoi cells and the structure of their surfaces, which we obtained at the end of part two.
Boolean Operations
The last step of the application consists of combining this data and obtaining the result with the help of boolean operations. All the preparation we did during the previous parts was for this moment. We have a data tree of Voronoi cells. Since this normally comes as a list from the Voronoi component, we first convert it into a list with the help of Graft. Parallel to this data tree, we have two more data trees consisting of spheres with the same path numbers. One of these data trees contains the spheres to add to each Voronoi cell. The other contains the spheres to be subtracted. All we have to do is combine one of these data trees with Solid Union (SUnion) first.
Then we finish the application with a Solid Difference (SDiff) to which we connect the output of this operation and the other data tree. These two boolean operations must be connected back-to-back in the same flow. Because if we connect them separately to Voronoi cells we will get separate results whereas what we expect is the final result where both additions and subtractions are made within all Voronoi cells.
Further Studies for 3D Voronoi Puzzle
This 3D Voronoi Puzzle application has a small shortcoming, can you see it in the figure? Some of the randomly fractured forms from Voronoi form very small surfaces. When we add indentation and protrusion details to these surfaces, they protrude and generate incorrect forms. Can you do the little intervention that prevents this? Let’s give a little hint, there are two ways to go. The first might be to ensure that the Voronoi 3D (Voronoi3) component does not produce surfaces that small in the first place. To do this, we can try to start from a controlled deformed three-dimensional grid. Thus, we can reduce the possibility of sharp corners and small surfaces.
The second way is simpler and more effective. After we obtained all the cells and blasted into the surfaces, we can exempt the smaller surfaces from all indentations and protrusions. Thus, we don’t generate interlocking details on small surfaces.
Debugging
In this application, we need more debugging. Some additions may be necessary to ensure that the application continues to work under all conditions. Of course, we need material and printer tests for the production of the parts from the 3D printer. In addition, it is necessary to try the solution order of each puzzle that we will produce here manually. Because there may be situations where we cannot insert a piece while others are blocking it. In short, at this stage, we left the product tests aside and only deal with this work geometrically.
You can rebuild the definition by looking at the image and explanation above. However, if you liked this content and want to support this website by downloading my Grasshopper file; would you consider being my Patreon? Here is the link to my Patreon page including the working Grasshopper files for the 3D Voronoi Puzzle and more.

